by Joseph T. Sinclair
Most people know this essential rule of good photography already, but it is worth restating, nonetheless, as a reminder: don’t shoot photos directly into the sun if you can avoid it.
Many photographers like shooting best in the early morning or late evening in the warm glow of the sun rising or setting. But I’m not one of those. I prefer to shoot in direct sunlight during the day. But if you’re a daylight shooter like me, you have to be careful. If you shoot directly into the sun you’re likely to get washed out photos, photos with a whitish haze, or photos lens flares. None of these is particularly enhancing to your photographs.
Shooting into the sun is particularly troublesome when you shoot an object in the foreground. The background will be well lighted, whereas the object the foreground will be dark in its own shadow. If you’re close enough to the object, you can use a flash to light up the object in the shadows. This is called a fill-in flash. The object the foreground might be vegetation, a vehicle, people, or almost anything. Unless you want a dark spot in your photo, you’ll have to use a flash.
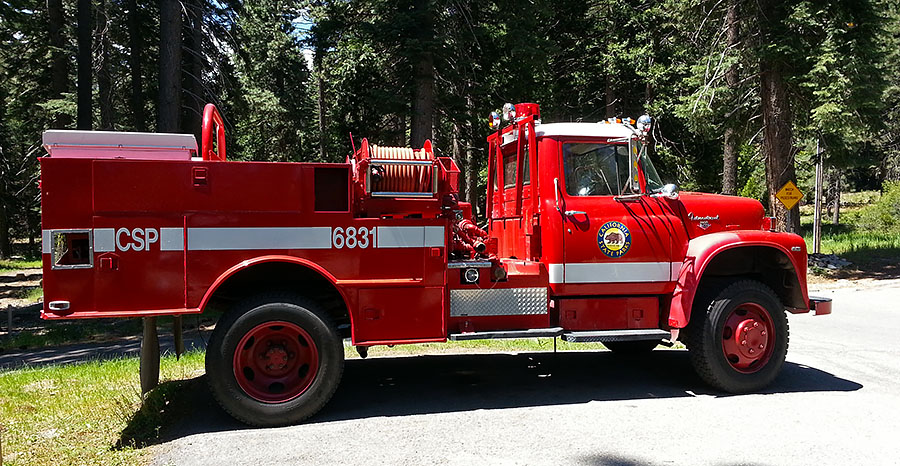
Fire Truck and Sun In the photo of the firetruck at the head of this article, the sun is slightly in front and to the side of the photographer. Consequently, the firetruck is in a partial shadow showing a dull red. Better to take this photo with the sun behind the photographer to bring out the beautiful bright red of the firetruck.
What’s the alternative? Well, the alternative is to shoot the object with the sun behind you if at all possible. This means changing positions (i.e., shooting the object from another side). Or it may mean moving the object so that you can shoot it with the sun streaming over your shoulder.
For instance, you see people shooting a group of their friends or relatives into the sun all the time. When they look at such photos, they may find that all the faces are so dark that you can barely recognize anyone. Better to rethink what you’re doing before you take a photo like that.
The into-the-sun shot isn’t the only problem. Shooting perpendicular to the suns rays also has its own set of problems. If you use a 3‑pound professional camera, you probably know that when you shoot perpendicular to the suns rays—that is, when the sun is on one side of you or the other—that you need to use a polarizing filter. A polarizing filter reduces haze and also cuts down on glare off broad surfaces such as water and makes the sky bluer.
Unfortunately, using a polarizing folder with a phone camera is inconvenient and not a likely solution that most people will use to improve their phone camera photography. Again, what’s the solution? The solution is to get the sun behind you when you’re shooting. That means the sun should be streaming over your shoulder towards the scene or object that you are shooting.
What does this tell you? It tells you that for certain and immobile objects or scenes (e.g., a building) that you must shoot them at the right time of day when the sun is streaming towards them over your shoulder. In other words, some things you have to shoot in the morning and others you will have to shoot later in the afternoon.

At noon the sun is directly overhead. Shooting in any direction will require a polarizing filter. So high noon is not the ideal time of day to shoot photos with your phone camera.
If you have to shoot into the sun, you can minimize the detrimental effects of the sun’s radiation by keeping as much of the sky out of your photo as possible. The same goes for large reflective surfaces such as water (e.g., lakes); keep such surfaces out of your photos much as you can.
So far we’ve been talking about a sunny day when the sun is out and shining. Perhaps the best time to take photographs is on a bright overcast day when the sky is not too dark and the clouds are acting as a giant diffuser for the sun. Diffused light is the best for photos, generally speaking. It does away with harsh shadows. It fully saturates colors. You don’t have to worry about the suns light; the light is everywhere because it’s diffused.
Nonetheless, even on for overcast days, you need to be careful. If the overcast clouds are thin, you still might have one part of the sky where the sun is much brighter than the remainder of the sky. In such a situation, you have to be careful just as if the sun were shining brightly without any overcast. And if the overcast gets too dark, it can give your photographs a dark cast, which can be quite unpleasant.
Of course, the worst possible situation is a partly cloudy day. The lighting can go from bright sun to diffused sun to dark overcast in a matter of a few seconds.
Keep in mind, there are special situations where you can get great photos shooting into the sun. For instance, if the sun is behind a substantial amount of foliage, it can make the translucent leaves glow with incandescent green. Look for other such backlit situations that will give you extraordinary photographs.

Let me sum up what I’ve discussed.
- Shoot with the sun behind you streaming over your shoulder whenever possible.
- If the day is bright overcast, get out and do some shooting. Conditions are ideal.
- If you have to shoot into the sun to get a photo of the particular object in the foreground, use a fill-in flash.
- Plan when during the day to shoot large immovable objects such as mountains, bridges, buildings, and the like. You want to have the sun behind you when you shoot them.
- If you can’t move the object to photograph it with the sun behind you, then position yourself in a different place where you can shoot the object without facing into the sun.
- Avoid shooting at high noon when the sun is directly overhead. That’s a situation where you will need a polarizing folder, which you are not likely to have for your phone camera.
- If you have to shoot into the sun, keep sky or broad reflective surfaces out of the photo as much as possible.
Finally, it must be said that this photography rule like all rules can be productively broken. Sometimes by shooting into the sun you can get special effects that you can’t get any other way, and such effects can make great photographs. The one thing you always need to remember is you can always check your photos on the smart phone’s screen, and if it’s not a good photo, try again.

![]()
![]()